Face tracking in .NET MAUI on iOS
Previously I discussed how to animate content that you add to a scene, while still enabling it to respond to touch interaction. This involves using the SCNAction type to animate a node by changing the attributes of the node it’s attached to.
In this blog post I’ll explore how to track a face in a scene. ARKit provides the ability to track multiple faces in a scene, and requires you to configure and run a face tracking session.
Note: You’ll need a physical iPhone to run an augmented reality app. ARKit requires the use of the camera, and you won’t have much joy using an iOS simulator.
Track a face
When face tracking is active, ARKit automatically adds face anchor objects (ARFaceAnchor) to the running session, containing information about the face, including its position and orientation. It’s common practice to create a dedicated class, known as a scene view delegate (a class that derives from ARSCNViewDelegate), to handle the overrides that are called when anchors are detected and place in the scene. To do this, you’ll first have to tell your ARSCNView object about your scene view delegate. This can be achieved by modifying the CreatePlatformView method in your handler to set the ARSCNView.Delegate property to the object that represents your scene view delegate:
public class ARViewHandler : ViewHandler<ARView, ARSCNView>
{
    MauiARView? _mauiARView;
    ...

    protected override ARSCNView CreatePlatformView()
    {
        var arView = new ARSCNView()
        {
            AutoenablesDefaultLighting = true,
            ShowsStatistics = true,
            Delegate = new SceneViewDelegate(),
        };

        _mauiARView = new MauiARView();
        _mauiARView.SetARView(arView);

        return arView;
    }
    ...
}
The scene view delegate class is a class that derives from ARSCNViewDelegate, and which overrides specific methods that are called when face anchors are detected and placed in the scene:
using ARKit;
using SceneKit;

namespace ARKitDemo.Platforms.iOS;

public class SceneViewDelegate : ARSCNViewDelegate
{
    public override void DidAddNode(ISCNSceneRenderer renderer, SCNNode node, ARAnchor anchor)
    {
        if (anchor is ARFaceAnchor)
        {
            ARSCNFaceGeometry? faceGeometry = ARSCNFaceGeometry.Create(renderer.Device!);
            node.Geometry = faceGeometry;
            node.Opacity = 0.8f;
        }
    }

    public override void DidUpdateNode(ISCNSceneRenderer renderer, SCNNode node, ARAnchor anchor)
    {
        if (anchor is ARFaceAnchor)
        {
            ARFaceAnchor? faceAnchor = anchor as ARFaceAnchor;
            ARSCNFaceGeometry? faceGeometry = node.Geometry as ARSCNFaceGeometry;
            faceGeometry?.Update(faceAnchor!.Geometry);
        }
    }
}
ARKit provides a coarse 3D mesh geometry that matches the size, shape, topology, and current facial expression of a detected face. This mesh geometry is encapsulated by the ARSCNFaceGeometry class, which provides an easy way to visualise the mesh. In this example, the DidAddNode method is called when a node (a new face) is detected in the scene. This method creates the facial geometry and sets it to be the geometry of the node that’s placed at the location of the ARFaceAnchor.
ARKit updates its face mesh to conform to the shape of the face, even as it blinks, talks, and makes different expressions. The DidUpdateNode method is called whenever the node’s position and orientation changes, and so the code updates the face geometry so that it follows the position and orientation of the face.
Face tracking differs from other uses of ARKit in the class you use to configure the session. To enable face tracking, create an ARFaceTrackingConfiguration object and configure its properties. This is achieved in the StartARSession method in the MauiARView class:
public class MauiARView : UIView
{
    ARSession? _arSession;
    ...

    public void StartARSession()
    {
        if (_arSession == null)
            return;

        _arSession.Run(new ARFaceTrackingConfiguration()
        {
            LightEstimationEnabled = true,
            MaximumNumberOfTrackedFaces = 1
        });
    }
    ...
}
The ARFaceTrackingConfiguration uses the front camera by default, enabling you to track a face in the scene:
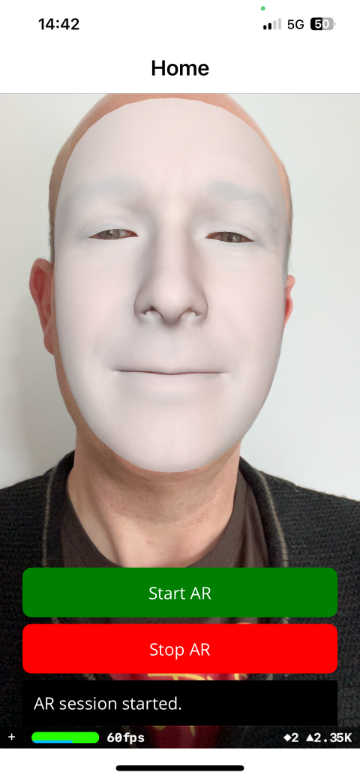
While overlaying a 3D mesh on a face isn’t that useful, it’s easy to see the potential for this technology. For example you could overlay other 3D content on the face such as glasses, enabling users to try different styles of glasses frames via an app.