Interacting with augmented reality content in .NET MAUI on iOS
Previously I discussed how to use .NET MAUI to create a basic augmented reality app on iOS. This involved creating a custom control that’s backed by a handler that uses ARKit and SceneKit to overlay a 3D cube on the camera output at the world origin.
In this blog post I’ll build on this to overlay an image on the camera output, and will enable the image to respond to touch interaction.
Note: You’ll need a physical iPhone to run an augmented reality app. ARKit requires the use of the camera, and you won’t have much joy using an iOS simulator.
Overlay an image on the scene
Objects that you overlay on the camera output are called nodes. By default, nodes don’t have a shape. Instead, you give them a geometry and apply materials to the geometry to provide a visual appearance. Nodes are represented by the SceneKit SCNode type.
One of the geometries provided by SceneKit is SCNPlane, which represents a square or rectangle. This type essentially acts as a surface on which to place other objects.
The following example shows the ImageNode type, which derives from SCNNode, that can be used to overlay an image onto a scene:
using SceneKit;
using UIKit;

namespace ARKitDemo.Platforms.iOS;

public class ImageNode : SCNNode
{
    public ImageNode(UIImage? image, float width, float height)
    {
        var rootNode = new SCNNode
        {
            Geometry = CreateGeometry(image, width, height),
            Constraints = new[] { new SCNBillboardConstraint() } // Make the node always face the camera
        };
        AddChildNode(rootNode);
    }

    static SCNGeometry CreateGeometry(UIImage? image, float width, float height)
    {
        var material = new SCNMaterial();
        material.Diffuse.Contents = image;
        material.DoubleSided = true;

        var geometry = SCNPlane.Create(width, height);
        geometry.Materials = new[] { material };

        return geometry;
    }
}
The ImageNode constructor takes a UIImage argument that represents the image to be added to the scene, and float arguments that represent the width and height of the image in the scene. The constructor creates a SCNNode, assigns a geometry to its Geometry property, and adds the node as a child node to the SCNNode.
The CreateGeometry method creates a SCNMaterial object that represents the image. Then, a SCNPlane object is created, of size width x height, and the SCNMaterial object is assigned to the geometry. Therefore, the shape of the node is defined by the SCNPlane object of width x height, and the material (the image) defines the visual appearance of the node.
As my previous blog post explained, the MauiARView type encapsulates the ARSCNView and ARSession objects that provide augmented reality functionality on iOS. Its AddContent method, which is called from the StartARSession method, is used to place content into the AR scene:
using ARKit;
using UIKit;

namespace ARKitDemo.Platforms.iOS;

public class MauiARView : UIView
{
    ARSCNView? _arView;
    ...

    void AddContent()
    {
        float width = 0.1f;
        float height = 0.1f;

        UIImage? image = UIImage.FromFile("dotnet_bot.png");
        var imageNode = new ImageNode(image, width, height);
        _arView?.Scene.RootNode.AddChildNode(imageNode);
    }
    ...
}
In this example, the AddContent method defines a width and height for the image, and loads a specified image into a UIImage from the app bundle. The width and height of the image in the scene are defined to be 10cm (1f=1m, 0.1f=10cm, 0.01f=1cm). An ImageNode is then created from the image, and added to the scene at the world origin (0,0,0):
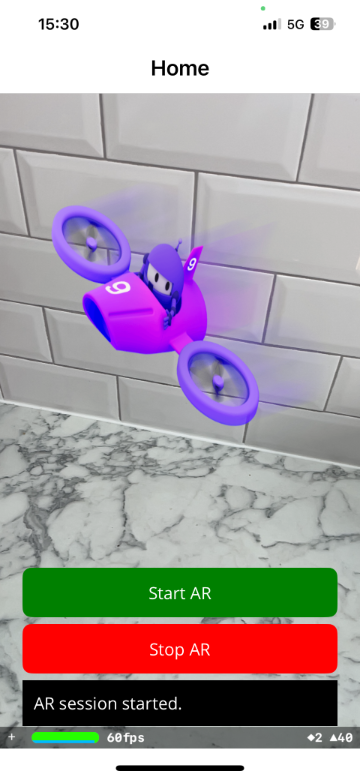
Because the image contains a transparent background it blends well into the scene.
Overlaying a node, or multiple nodes, onto a scene is typically the first step in creating an augmented reality app. However, such apps typically require interaction with the nodes.
Interact with a node in the scene
Augmented reality apps often allow touch-based interaction with the nodes that are overlayed on a scene. The UIGestureRecognizer types can be used to detect gestures on nodes, which can then be manipulated as required.
The MauiARView type must be told to listen for gestures so that the app can respond to different touch interactions. This can be accomplished by creating the required gesture recognizers and adding them to the ARSCNView object with the AddGestureRecognizer method:
using ARKit;
using UIKit;
using CoreGraphics;
using SceneKit;

namespace ARKitDemo.Platforms.iOS;

public class MauiARView : UIView
{
    ARSCNView? _arView;
    ARSession? _arSession;
    UITapGestureRecognizer? _tapGesture;
    UIPinchGestureRecognizer? _pinchGesture;
    UIPanGestureRecognizer? _panGesture;
    ...

    public void StartARSession()
    {
        if (_arSession == null)
            return;

        _arSession.Run(new ARWorldTrackingConfiguration
        {
            AutoFocusEnabled = true,
            LightEstimationEnabled = true,
            PlaneDetection = ARPlaneDetection.None,
            WorldAlignment = ARWorldAlignment.GravityAndHeading
        }, ARSessionRunOptions.ResetTracking | ARSessionRunOptions.RemoveExistingAnchors);

        AddGestureRecognizers();
        AddContent();
    }

    void AddGestureRecognizers()
    {
        _tapGesture = new UITapGestureRecognizer(HandleTapGesture);
        _arView?.AddGestureRecognizer(_tapGesture);

        _pinchGesture = new UIPinchGestureRecognizer(HandlePinchGesture);
        _arView?.AddGestureRecognizer(_pinchGesture);

        _panGesture = new UIPanGestureRecognizer(HandlePanGesture);
        _arView?.AddGestureRecognizer(_panGesture);
    }
    ...
}
In this example, gesture recognizers are added for the tap, pinch, and pan gestures when the AR session starts. The following code example shows the methods that are used to process these gestures:
void HandleTapGesture(UITapGestureRecognizer? sender)
{
    SCNView? areaTapped = sender?.View as SCNView;
    CGPoint? location = sender?.LocationInView(areaTapped);
    SCNHitTestResult[]? hitTestResults = areaTapped?.HitTest((CGPoint)location!, new SCNHitTestOptions());
    SCNHitTestResult? hitTest = hitTestResults?.FirstOrDefault();

    SCNNode? node = hitTest?.Node;
    node?.RemoveFromParentNode();
    _arView?.RemoveGestureRecognizer(_tapGesture!);
    _arView?.RemoveGestureRecognizer(_pinchGesture!);
    _arView?.RemoveGestureRecognizer(_panGesture!);
}

void HandlePinchGesture(UIPinchGestureRecognizer? sender)
{
    SCNView? areaPinched = sender?.View as SCNView;
    CGPoint? location = sender?.LocationInView(areaPinched);
    SCNHitTestResult[]? hitTestResults = areaPinched?.HitTest((CGPoint)location!, new SCNHitTestOptions());
    SCNHitTestResult? hitTest = hitTestResults?.FirstOrDefault();

    if (hitTest == null)
        return;

    SCNNode node = hitTest.Node;
    float scaleX = (float)sender.Scale * node.Scale.X;
    float scaleY = (float)sender.Scale * node.Scale.Y;
    float scaleZ = (float)sender.Scale * node.Scale.Z;

    node.Scale = new SCNVector3(scaleX, scaleY, scaleZ);
    sender.Scale = 1;
}

void HandlePanGesture(UIPanGestureRecognizer? sender)
{
    SCNView? areaPanned = sender?.View as SCNView;
    CGPoint? location = sender?.LocationInView(areaPanned);
    SCNHitTestResult[]? hitTestResults = areaPanned?.HitTest((CGPoint)location!, new SCNHitTestOptions());
    SCNHitTestResult? hitTest = hitTestResults?.FirstOrDefault();

    SCNNode? node = hitTest?.Node;
    if (sender?.State == UIGestureRecognizerState.Changed)
    {
        CGPoint translate = sender.TranslationInView(areaPanned);
        node?.LocalTranslate(new SCNVector3((float)-translate.X / 10000, (float)-translate.Y / 10000, 0.0f));
    }
}
All three methods share common code that determines the node on which a gesture was detected. Code that interacts with the node is then executed:
- The
HandleTapGesturemethod removes the node from the scene when it’s tapped, and then removes all of the gesture recognizers from theARSCNView(there’s no need to listen for gestures when there isn’t a node present in the scene). - The
HandlePinchGesturemethod scales the width and height of the node using a pinch gesture. - The
HandlePanGesturemethod moves the node using a pan gesture.
The overall effect is that the image that’s been added to the scene can be removed, scaled, and moved within the scene. Additional gesture reognizers could also be added, for example rotation, swipes, and long presses.