Augmented reality basics in .NET MAUI on iOS
Augmented reality (AR) is the process of an app adding a 2D or 3D element to the live view from a device’s camera in a way that makes those elements appear to inhabit the real world. On iOS, augmented reality apps can be built by using ARKit (and RealityKit), which combines device motion tracking, world tracking, and scene understanding to simplify building an AR experience.
ARKit requires iOS 11.0 or later and an iOS device with an A9 or later processor. Some ARKit features require later iOS versions or specific devices.
Note: You’ll need a physical iPhone to run an augmented reality app. ARKit requires the use of the camera, and you won’t have much joy using an iOS simulator.
One approach to using augmented reality in a .NET MAUI app that targets iOS is to create a custom control that’s backed by a handler. This involves:
- Performing platform setup. For more information, see Platform setup.
- Creating a custom augmented reality control (a view). For more information, see Create the custom control.
- Creating a handler for the control. For more information, see Create the handler.
- Creating any required platform code. For more information, see Create platform code.
- Registering the handler in your app’s
MauiProgramclass. For more information, see Register the handler. - Consuming the control. For more information, see Consume the control.
In this blog post I’ll explore this approach to create a simple augmented reality iOS app that overlays a 3D cube to the camera output.
For more information about creating a custom control using handlers, see Create a custom control using handlers.
Platform setup
ARKit uses the device camera, so you’ll need to configure iOS privacy controls so that the user can permit camera access for your app. This can be achieved by adding the following key to your Info.plist:
<key>NSCameraUsageDescription</key>
<string>This app uses the camera for augmented reality features.</string>
For more information, see Verifying device support and user permission.
Deploying an ARKit app to your iPhone requires at a minimum an Apple ID. Then you can use automatic provisioning to deploy the app to your iPhone, without requiring a paid Apple Developer account. This will require you to add the $(CodesignKey) and $(CodesignProvision) build properties to your .csproj file, with the $(CodesignKey) property being set to the name of the codesign key:
<PropertyGroup Condition="$(TargetFramework.Contains('-ios'))">
    <CodesignKey>Apple Development: John Smith (YD36S43GWU)</CodesignKey>
    <CodesignProvision>Automatic</CodesignProvision>
</PropertyGroup>
When you first attempt to run your app you’ll have to enable developer mode on your device. For more information, see Enabling Developer Mode on a device.
Create the custom control
To create the custom control, you should create a class that derives from View:
namespace ARKitDemo.Controls;

public class ARView : View
{
    public static readonly BindableProperty IsSessionRunningProperty =
        BindableProperty.Create(nameof(IsSessionRunning), typeof(bool), typeof(ARView), false);

    public bool IsSessionRunning
    {
        get => (bool)GetValue(IsSessionRunningProperty);
        set => SetValue(IsSessionRunningProperty, value);
    }
}
The control, named ARView, simply provides a public API (IsSessionRunning) that will be accessed by its handler and control consumers to start and stop an AR session.
Create the handler
After creating your custom control, you should create a handler for it:
using ARKit;
using Microsoft.Maui.Handlers;
using ARKitDemo.Controls;
using ARKitDemo.Platforms.iOS;

namespace ARKitDemo.Handlers;

public class ARViewHandler : ViewHandler<ARView, ARSCNView>
{
    MauiARView? _mauiARView;

    public static IPropertyMapper<ARView, ARViewHandler> Mapper = new PropertyMapper<ARView, ARViewHandler>(ViewMapper)
    {
        [nameof(ARView.IsSessionRunning)] = MapIsSessionRunning
    };

    public ARViewHandler() : base(Mapper)
    {
    }

    protected override ARSCNView CreatePlatformView()
    {
        var arView = new ARSCNView()
        {
            AutoenablesDefaultLighting = true,
            DebugOptions = ARSCNDebugOptions.ShowWorldOrigin,
            ShowsStatistics = true
        };

        _mauiARView = new MauiARView();
        _mauiARView.SetARView(arView);

        return arView;
    }

    public static void MapIsSessionRunning(IViewHandler handler, IView view)
    {
        if (handler is ARViewHandler arHandler && view is ARView arView)
        {
            if (arView.IsSessionRunning)
                arHandler._mauiARView?.StartARSession();
            else
                arHandler._mauiARView?.StopARSession();
        }
    }

    protected override void ConnectHandler(ARSCNView platformView)
    {
        base.ConnectHandler(platformView);

        if (VirtualView != null)
            MapIsSessionRunning(this, VirtualView);
    }

    protected override void DisconnectHandler(ARSCNView platformView)
    {
        _mauiARView?.StopARSession();

        platformView.Dispose();
        base.DisconnectHandler(platformView);
    }
}
The handler contains a property mapper, that defines what to do when a property change occurs in the custom control. In this case, the property mapper maps the IsSessionRunning property to a method that will execute when the property changes. When the property becomes true it starts an AR session. When the property becomes false it stops the AR session.
The handler also overrides the following methods:
CreatePlaformView, which creates and returns a customMauiARViewobject that implements the ARKit functionality.ConnectHandler, which calls theMapIsSessionRunningmethod when the handler is connected to its custom control.DisconnectHandler, which stops the AR session when the handler is disconnected from its custom control, and performs native view cleanup.
Create platform code
ARKit functionality is largely encapsulated in the custom MauiARView type to keep native view code separated from its handler:
using ARKit;
using UIKit;

namespace ARKitDemo.Platforms.iOS;

public class MauiARView : UIView
{
    ARSCNView? _arView;
    ARSession? _arSession;

    public static bool IsARSupported()
    {
        return ARConfiguration.IsSupported;
    }

    public void StartARSession()
    {
        if (_arSession == null)
            return;

        _arSession.Run(new ARWorldTrackingConfiguration
        {
            AutoFocusEnabled = true,
            LightEstimationEnabled = true,
            PlaneDetection = ARPlaneDetection.Horizontal,
            WorldAlignment = ARWorldAlignment.GravityAndHeading
        }, ARSessionRunOptions.ResetTracking | ARSessionRunOptions.RemoveExistingAnchors);

        AddContent();
    }

    public void StopARSession()
    {
        _arSession?.Pause();
    }

    protected override void Dispose(bool disposing)
    {
        if (disposing)
        {
            _arSession?.Dispose();
            _arView?.Dispose();

            _arSession = null;
            _arView = null;
        }
        base.Dispose(disposing);
    }

    internal void SetARView(ARSCNView view)
    {
        _arView = view;
        _arSession = view.Session;
    }

    void AddContent()
    {
        float size = 0.05f;
        var sphereNode = new CubeNode(size, UIColor.Blue);
        _arView?.Scene.RootNode.AddChildNode(sphereNode);
    }
}
The MauiARView type encapsulates ARSCNView and ARSession objects, that provide AR functionality on iOS:
- The
ARSCNViewobject blends virtual content with the device camera view of the world. - The
ARSessionobject coordinates the processes that ARKit uses to create the AR experience. This includes reading data from the device’s motion sensing hardware, controlling the camera, and performing image analysis. The session synthesizes all of these results to establish a correspondence between the space the device inhabits and the space where you model AR content.
The MauiARView class contains public methods for starting and stopping an AR session, and for determing if the device supports AR experiences. When the session for the ARSCNView runs, by calling the ARSession.Run method, it automatically sets the camera output to be the background of the view. In addition, the initial device location is registered as the world origin (X=0, Y=0, Z=0). Any objects you place in the scene will be relative to the world origin. If you don’t specify the position of an object within a scene, it will by default be placed at the world origin (0,0,0).
Note: When calling the ARSession.Run method, you provide a type of ARConfiguration object that defines the type of AR functoinality you want to use. The ARWorldTrackingConfiguration object enables world tracking, including plane, image, and object detection.
The AddContent method is used to place content into the AR scene. In the code above, a cube, represented by the custom CubeNode type, is added to the scene at the default world origin.
While ARKit makes possible the AR experiences, it’s SceneKit which is used to place objects into AR scenes. Objects that you overlay on the camera output are called nodes. By default, nodes don’t have a shape. Instead, you give them a geometry (shape) and apply material to the geometry to provide a visual appearance. Nodes are represented by the SceneKit SCNNode type:
using SceneKit;
using UIKit;

namespace ARKitDemo.Platforms.iOS;

public class CubeNode : SCNNode
{
    public CubeNode(float size, UIColor color)
    {
        var rootNode = new SCNNode
        {
            Geometry = CreateGeometry(size, color)
        };
        AddChildNode(rootNode);
    }

    static SCNGeometry CreateGeometry(float size, UIColor color)
    {
        var material = new SCNMaterial();
        material.Diffuse.Contents = color;

        var geometry = SCNBox.Create(size, size, size, 0);
        geometry.Materials = new[] { material };

        return geometry;
    }
}
Optionally, the position of the node in 3D space can be defined by setting the Position property of the SCNNode to a SCNVector3 object that defines the X,Y,Z coordinates of the node. The values of X,Y,Z are floats where 1f=1m, 0.1f=10cm, and 0.01f=1cm.
Register the handler
A custom control and its handler must be registered with an app, before it can be consumed. This should occur in the CreateMauiApp method in the MauiProgram class in your app:
using Microsoft.Extensions.Logging;
using ARKitDemo.Controls;
using ARKitDemo.Handlers;
using ARKitDemo.ViewModels;

namespace ARKitDemo;

public static class MauiProgram
{
	public static MauiApp CreateMauiApp()
	{
		var builder = MauiApp.CreateBuilder();
		builder
			.UseMauiApp<App>()
			.ConfigureFonts(fonts =>
			{
				fonts.AddFont("OpenSans-Regular.ttf", "OpenSansRegular");
				fonts.AddFont("OpenSans-Semibold.ttf", "OpenSansSemibold");
			})
			.ConfigureMauiHandlers(handlers =>
			{
				handlers.AddHandler<ARView, ARViewHandler>();
			});

#if DEBUG
		builder.Logging.AddDebug();
#endif

		return builder.Build();
	}
}
The handler is registered with the ConfigureMauiHandlers and AddHandler method. The first argument to the AddHandler method is the custom control type, with the second argument being its handler type.
Consume the control
After registering the handler with your app, the custom control can be consumed:
<ContentPage xmlns="http://schemas.microsoft.com/dotnet/2021/maui"
             xmlns:x="http://schemas.microsoft.com/winfx/2009/xaml"
             xmlns:controls="clr-namespace:ARKitDemo.Controls"
             xmlns:viewmodels="clr-namespace:ARKitDemo.ViewModels"
             x:Class="ARKitDemo.Views.MainPage"
             x:DataType="viewmodels:MainPageViewModel">
    <ContentPage.BindingContext>
        <viewmodels:MainPageViewModel />
    </ContentPage.BindingContext>
    <Grid>
        <controls:ARView IsSessionRunning="{Binding IsARActive}" />
        <VerticalStackLayout VerticalOptions="End" Margin="20" Spacing="6">
            <Button Text="Start AR"
                    Command="{Binding StartARCommand}"
                    BackgroundColor="Green"
                    TextColor="White" />
            <Button Text="Stop AR"
                    Command="{Binding StopARCommand}"
                    BackgroundColor="Red"
                    TextColor="White" />
            <Label Text="{Binding StatusMessage}"
                   BackgroundColor="Black"
                   TextColor="White"
                   Padding="10" />
        </VerticalStackLayout>
    </Grid>
</ContentPage>
In this example, the BindingContext for the page is set to MainPageViewModel, and the ARView control binds its IsSessionRunning property to the IsARActive property in the view model. Button objects are used to start and stop the AR session, and a Label indicates whether the AR session is running or not.
In the view model, the StartAR and StopAR methods are executed in response to the relevant Button in the UI being pressed:
using ARKitDemo.Platforms.iOS;
using CommunityToolkit.Mvvm.ComponentModel;
using CommunityToolkit.Mvvm.Input;

namespace ARKitDemo.ViewModels;

public partial class MainPageViewModel : ObservableObject
{
    [ObservableProperty]
    public bool isARActive;

    [ObservableProperty]
    string statusMessage = "AR ready.";

    [RelayCommand]
    void StartAR()
    {
        if (MauiARView.IsARSupported())
        {
            IsARActive = true;
            StatusMessage = "AR session started.";
        }
        else
        {
            StatusMessage = "AR unsupported on this device.";
        }
    }

    [RelayCommand]
    void StopAR()
    {
        IsARActive = false;
        StatusMessage = "AR session stopped.";
    }
}
The StartAR method calls the static MauiARView.IsARSupported method to determine if the code is running on an AR-capable device (not a simulator). If AR is supported the IsARActive property is set to true. The overall effect is that when the IsARActive becomes true, the ARView.IsSessionRunning property becomes true. This causes the handler to start the AR session, and the app displays the camera output and adds a cube to the scene at the world origin:
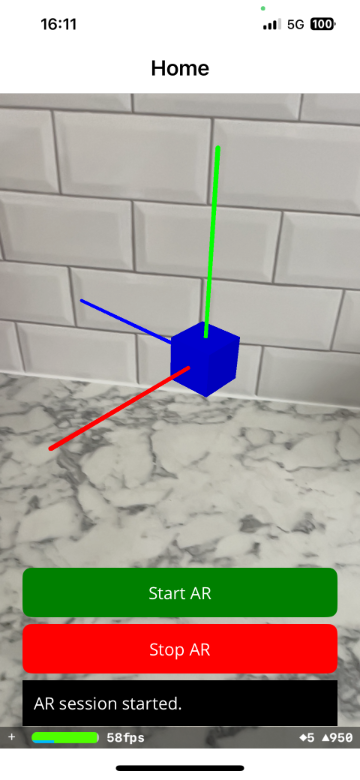
I’m going to continue exploring ARKit in further blog posts, because there’s some really powerful functionality in it that can be used to build compelling AR experiences.